Package Information
- Last Updated
- Authors
- PreFigure contributors
- Categories
- visualization
- Dependencies
- @preview/xmlit:0.1.3
1. Get the package
Download the package using the TPIX CLI:
tpix get @preview/prefigure:0.1.02. Import in your Typst file
Add this to your .typ file:
#import "@preview/prefigure:0.1.0": *prefigure
Author and render PreFigure mathematical diagrams from
inside a Typst document. You write PreFigure XML or build a prefigure diagram with native Typst functions.
Then PreFigure, running as a WASM plugin, renders the geometry; Typst renders the text and the math.
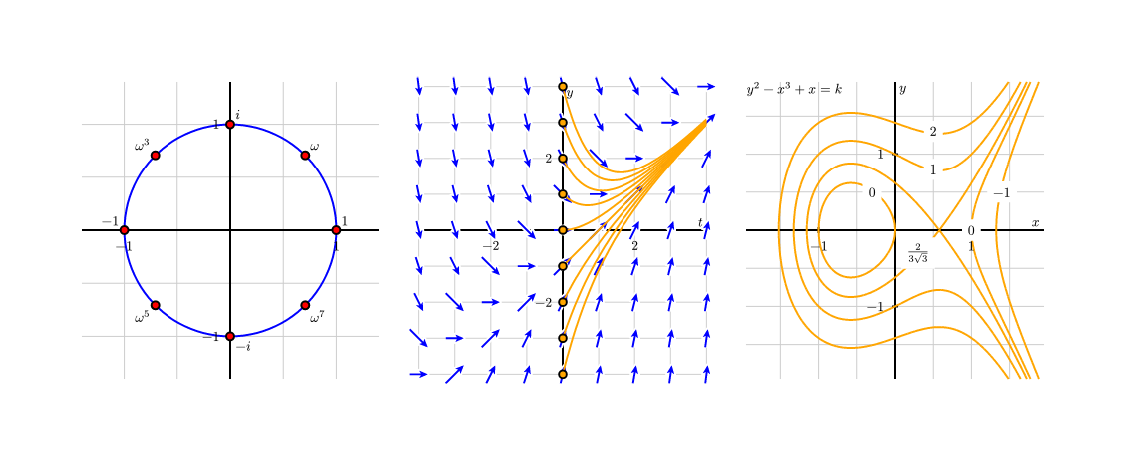
If you have an existing diagram saved, you can write:
#import "@preview/prefigure:0.1.0": prefigure

#prefigure(read("diagram.xml"))
The contents of every <label> and <m> is extracted and rendered by Typst; labels and equations match the surrounding font/style.
Authoring inline, without XML
A Typst user might not want to author raw XML. The package re-exportsa tags submodule
(via xmlit) with a
constructor for every PreFigure element, so a diagram can be written in
native Typst syntax — including $...$ for math.
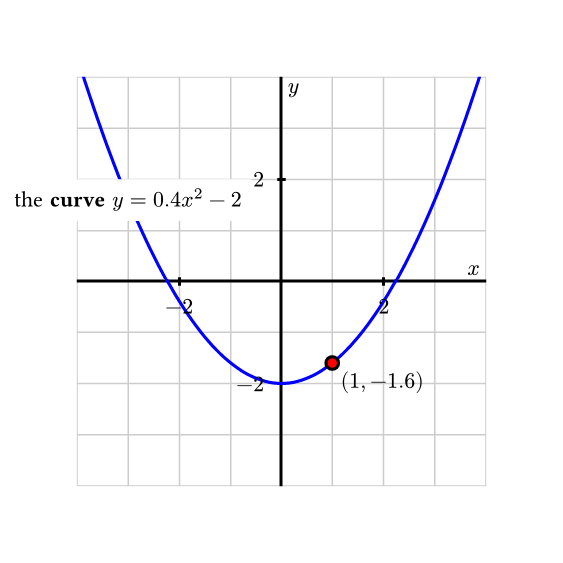
#import "@preview/prefigure:0.1.0": prefigure, tags

#let doc = {
  import tags: *
  diagram(dimensions: (260, 260), {
    show: coordinates.with(bbox: (-4, -4, 4, 4))

    grid-axes(xlabel: "x", ylabel: "y")
    graph(function: "f(x)=0.4*x^2 - 2")
    point(
      p: "(1,f(1))",
      alignment: "southeast",
      $(1, #(0.4 * 1 * 1 - 2))$,
    )
    label(
      p: "(-3, f(-3))",
      alignment: "center",
      clear-background: true,
    )[the *curve* $y = 0.4 x^2 - 2$]
  })
}

#prefigure(doc, width: 8cm)
It is good practice to do a spat import (#import tags: *) inside a scoped environemnt (e.g., inside #{...} or #[...])
as some PreFigure tag names conflict with global Typst function names.
When authoring PreFigure XML with Typst functions, boolean values of true/false are automatically converted to strings "yes"/"no". Additionally, arrays are serialized as strings with square brackets. So bbox: (1,2,3,4)
becomes bbox: "[1,2,3,4]".
Debugging your PreFigure code
If you ever need to inspect the XML generated, you can use the xml-to-string function to show the xml source directly in your document. You can then copy-and-paste it into the PreFigure Playground for
interactive debugging.
#import "@preview/prefigure:0.1.0": tags, xml-to-string

#let doc = {
  import tags: *
  diagram(dimensions: (260, 260), {
    show: coordinates.with(bbox: (-4, -4, 4, 4))
    grid-axes(xlabel: "x", ylabel: "y")
  })
}

// Shows `<diagram dimensions="[260,260]"><coordinates bbox="[-4,-4,4,4]"><grid-axes xlabel="x" ylabel="y" /></coordinates></diagram>`
#xml-to-string(doc)
Fonts
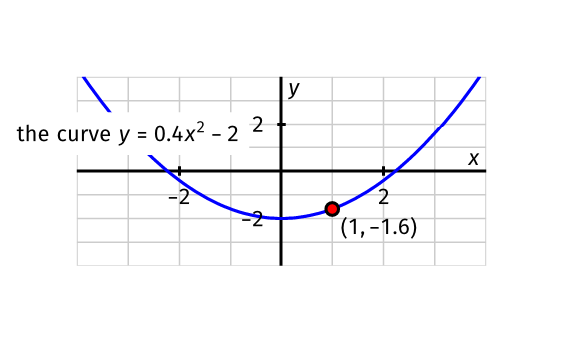
Fonts can be set using Typst's #set mechanism. However due to current limitations you can only set the font outside the figure itself (i.e., no calling #set text(...) inside a PreFigure <lable>).
#import "@preview/prefigure:0.1.0": prefigure, tags, xml-to-string
#set text(font: "Fira Math")
#show math.equation: set text(font: "Fira Math")

#let doc = {
  import tags: *
  diagram(dimensions: (260, 120), {
    show: coordinates.with(bbox: (-4, -4, 4, 4))

    grid-axes(xlabel: "x", ylabel: "y")
    graph(function: "f(x)=0.4*x^2 - 2")
    point(
      p: "(1,f(1))",
      alignment: "southeast",
      $(1, #(0.4 * 1 * 1 - 2))$,
    )
    label(
      p: "(-3, f(-3))",
      alignment: "center",
      clear-background: true,
    )[the *curve* $y = 0.4 x^2 - 2$]
  })
}

#prefigure(doc, width: 8cm)
Occassionally, PreFigure falls back to using a <text> node in the generated <svg>. These nodes are assigned
generic font names (sans-serif, …). You can pass a fonts: ... argument to map these to concrete
families Typst can measure and render:
#prefigure(read("diagram.xml"), fonts: (sans-serif: "Fira Sans"), width: 10cm)
API
prefigure(
  source,              // XML string, bytes, or an xmlit tree (e.g. tags.diagram(…))
  width: auto,         // e.g. 8cm — otherwise the SVG's own user-unit size (96dpi)
  labels: "native",       // "svg" (baked) or "native" (live Typst text); math ⇒ native
  fonts: none,         // (sans-serif: "…", …) overrides for svg mode
  math-items: (:),     // equations from xmlit's extract-math (auto-filled for a tree)
  handlers: …,         // xmlit content handlers for a tree (default: _→<it>, *→<b>)
  validate: false,     // false = skip (default) · true = show errors inline · "panic" = fail
  ..image-args,        // forwarded to Typst's image() (alt, fit, …)
)
Validation against the PreFigure RELAX NG schema is opt-in. Pass validate: true to render the diagram with any schema errors shown in a red callout beneath
it (non-fatal, with a located source snippet), or validate: "panic" to abort
the compile on invalid input instead.
The tags submodule exports a constructor for every PreFigure element
(tags.diagram, tags.grid-axes, tags.riemann-sum, …). It is a module, so you
can either keep the tags. prefix or bring the constructors into scope:
#import "@preview/prefigure:0.1.0": prefigure, tags
#import tags: *                                  // now: diagram(…), graph(…), label(…)
// or import just the ones you use:
#import tags: diagram, coordinates, grid-axes, graph, label
How it works
The plugin contains a WASM compiled version of the PreFigure compiler. When run on an XML file,
all <m> tags are extracted and rendered with the mitex plugin. The rendering works in two
passes: first the plugin is called with the XML source and returned is a list of items that
PreFigure needs to know the layout size of. Typst renders and computes the size
of those itmes and passes the metrics back to the PreFigure compiler, which assembles an SVG.
The SVG is directly embedded in the Typst document and all pre-rendered labels and math are
placed over the SVG where needed.
Building the plugin
The built wasm (src/prefig_typst_plugin.wasm) is
checked in, so the package works without a Rust toolchain. To rebuild it you need
the wasm32-unknown-unknown target:
cd wasm-interface
./build.sh              # default (~1.7 MiB) — Typst does the math
./build.sh --with-math  # embed RaTeX to bake math into the SVG (~5.4 MiB)
The default build carries no math engine because Typst renders the math; use
--with-math only if you need math baked into a self-contained SVG with no live
overlay.
Testing
TYPST=/path/to/typst tests/run.sh
This runs the native protocol tests (cargo test, no Typst needed) and, if a
typst binary is found, compiles every fixture and asserts the render
invariants. Verified against Typst 0.15.1.